Pressing edible flowers is a simple way to add natural, breathtaking beauty to desserts. This step-by-step floral baker's guide outlines my go-to, no-gadget method for how to press edible flowers for baking so you can decorate cookies, cakes, and other bakes with delicate, colorful blooms. Prefer to watch? I’ve added a quick video tutorial to walk you through it.

This guide shows exactly how I have pressed flowers for edible flower baking using the simple book pressing method. This easy way to press flowers yields flat, papery blooms ready for pressed flower cookies and cakes. I've also included a short list of common alternative methods, but I haven't personally tested them all (yet!).
Edible flowers are the easiest way to elevate everyday baking, adding gentle, garden-fresh flavor and a pop of natural color—no dyes, just natural beauty. They have an instant "wow" factor, turning simple bakes into boutique creations. Whether you're dressing up weeknight cookies or baking an edible flowers cake for a shower or brunch, pressed blooms make it effortlessly elegant.
New to baking with flowers? Start with my Edible Flowers 101 and browse reader-favorite recipes like soft and chewy lemon lavender cookies and lemon lavender cupcakes for an easy win. I'm already dreaming up another edible flower cookies recipe and am excited to use edible flowers for cakes.
Why Press Edible Flowers for Baking?
Pressing keeps real flowers looking as vibrant on the plate as they do in the garden. By flattening and drying the petals first, blooms sit flush, hold their shape, and resist oven curl or browning. It's a simple step that turns a pretty idea into a polished result. Here are a few reasons you should press edible flowers before them using in your desserts:
- Keeps blooms flat so they sit flush on cookies and cakes (no lifting or snagging).
- Preserves delicate color and shape by removing moisture before adding heat.
- Prevents blooms from browning or curling in the oven for a clean, polished finish.
Watch How to Press Edible Flowers (Quick Tutorial)
What You'll Need to Press Flowers the Easy Way (Book Press/Weight Method)
No special gadgets required! Just simple, absorbent layers and a little weight. Here's what you need to press flowers using the book press/weight press method.

- Edible flowers: Small, flat blooms press best (think violas, pansies, chamomile, dianthus, calendula petals, borage). Be sure to use edible, unsprayed organic flowers only.
- Absorbent paper: For the inner layers, plain printer paper or coffee filters work well. Blotting paper is great if you have it but not necessary! You need 2 inner sheets per layer to wick moisture from each side. Tip: Don't use textured paper towels to press your flowers (they imprint) or glossy magazine pages (not absorbent).
- Parchment paper: For the outer layers, parchment paper or wax paper helps to ensure the moisture and/or color from your blooms doesn't seep into your book pages or other surfaces and cause damage.
- Heavy books: Any big, heavy flat weight will work. I use a large cookbook with a stack of books on top, but you could use a cast-iron skillet or a heavy cutting board with weights.
- Small scissors and fine tweezers: Although not required, small scissors help trim bulky flower stems, and tweezers are helpful in handling the delicate dried flowers and placing the petals precisely without damage.
- Kitchen towels/paper towels: For patting dry after the rinsing.
- Food-grade silica gel packet: Optionally, this helps to keep things dry in your airtight container when storing your pressed flowers.
Best Edible Flowers to Press for Baking
Disclaimer: Make sure you are using edible flowers! Every flower is beautiful, but not every flower is edible, and some are even poisonous. Before using a flower in your baked goods, be 100% certain what it is and where it came from. Only use organically grown flowers that are free from pesticides or other chemicals. Also, be aware of any pollen allergies or plant-triggered allergies.
When choosing which flowers to use, you want to focus on taste and flower shape. Edible flowers aren't only "floral" flavored. In fact, some can have quite a strong bite to them.
If you're purchasing edible flowers online, do a quick search beforehand to ensure you'll enjoy the flavor. For many flowers, the flavor shouldn't be overpowering once on top of the cookies – they're more for decoration!
For decorating cookies and the sides of cakes, you want to choose flowers that will lie flat. Pansies and violas naturally lie flat, while roses, geraniums, or marigolds are harder to press. If you want to use thicker flowers, I recommend using only the petals, not the whole flower.
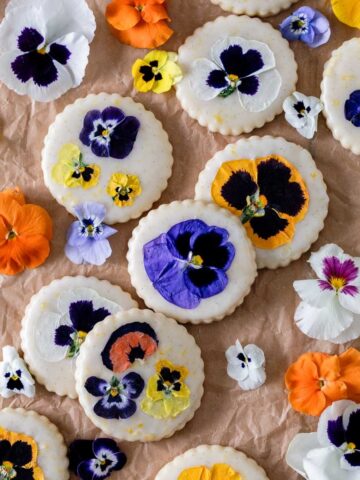
I used pansies and violas for my edible flower sugar cookies, as they're mild in flavor, lie flat, and come in an assortment of bright colors. When pressed, pansies and violas look extremely similar to when they're fresh. They're also readily available and easy to plant yourself!
Substitute different flower varieties depending on what's available to you, or use flowers that fit a specific color scheme. You can also give herb flowers a try, such as rosemary, thyme, and sage.

Best Edible Flowers for Pressing (Quick Picks)
Chosen for thin petals, flat profiles, and low moisture—aka they press cleanly and stay tidy!
- Violas/Johnny Jump-Ups: Tiny, cheerful blooms in a rainbow of colors. Paper-thin and lie flat with minimal trim. Delicate, mild, lightly grassy taste.
- Pansies: Bold, colorful "faces" and velvety petals. Trim calyx. Mild vegetal and sweet flavor.
- Chamomile: Mini-daisy like flowers add whimsy. Tiny heads dry fast (remove stems). Soft, apple-honey flavor.
- Primroses: Soft and pastel-colored. Ultra-thin petals. Gentle, floral-sweet taste.
- Forget-Me-Nots: Tiny and dainty with vivid blue petals. Extremely mild, almost neutral flavor.
- Calendula (petals only): Bright orange or yellow petals with confetti look. Plucked petals press clean. Tangy/peppery kick.
- Cornflowers/Bachelor's Buttons: Frilly and feather-like in shades of blue, pink, or purple. Separate into small florets. Very mild, slightly earthy taste.
- Rose Petals: Elegant and romantic ranging from pale pink to deep red. Avoid thick/large pieces. Delicately floral taste.
- Borage: Star-shaped and sky blue. Fragile star points. Refreshing cucumber taste.
Herbs That Press Nicely
- Thyme: Micro leaves press paper-flat. Earthy, lemon-tinged flavor.
- Mint (small leaves): Press individually. Can darken if damp. Potent mint taste.
- Lemon Balm: Thin leaves are easy to flatten. Soft lemon taste.
- Rosemary: Needle-like leaves. Woodsy, piney taste with rustic look. Use sparingly.
- Sage (young leaves): Small, tender leaves press best. Mellow savory flavor.
Mimic the Season with your Edible Flowers
Get inspired by the colors and flavors of the season when decorating desserts with edible flowers.
In the spring, use pastel blooms like pansies, violas, and chamomile paired with bright flavors such as lemon, lavender, or rose. Perfect for Easter, Mother's Day, and garden parties.
In the summer, use bold, vibrant flowers like marigolds, calendula, and borage with citrus or berry glazes. Ideal for bridal showers, picnics, and birthdays.
In the fall, use muted tones like deep orange, burgundy, or marigold petals paired with warm flavors such as cinnamon, cardamom, or chai glaze. These give your desserts a cozy, autumn feel.
In the winter, use white blooms, evergreen sprigs (like rosemary or thyme), or red petals arranged in wreath shapes. Pair with flavors like vanilla bean, peppermint, or a touch of almond for a festive holiday feel.

Where to Find Edible Flowers for Baking
There are plenty of places to find edible flowers for baking once you start looking! Wherever you get your edible flowers, make sure they've been grown organically. Commercial florists often spray chemicals that are unsafe to eat, so avoid supermarkets or florist shops unless they're labeled USDA organic for culinary use.
- Local Farmer's Market: This is a great place to start, since a lot of vegetable farmers also grow edible flowers to attract pollinators and deter garden pests. Ask them if you can buy edible flowers from them, and I'm sure they'd be very excited!
- Your Own Home Garden: The easiest and safest place to get edible flowers. If you're using fresh flowers from your edible flower garden, pick the flowers in the morning, after the dew has evaporated but before the afternoon heat and sun.
- Online: Gourmet Sweet Botanicals has a large assortment of edible flowers available for purchase. I haven't personally used their service, but I've heard great things. Etsy is also a great place to find edible flowers. I buy my dried edible flowers online!
- Specialty Food Stores or Organic Grocery Stores: Natural and gourmet food stores like Whole Foods and other specialty cuisine stores sometimes have a selection of edible flowers. You might find them near the fresh herbs, in the tea aisle, or in the baking or international food aisles.
- Forage: Only forage for edible flowers if you're confident in your flower identification. Be sure to avoid anything growing by the road and private property.
Step-by-Step: How to Press Edible Flowers (Book/Weight Method)
Follow these step-by-step instructions to make flawless pressed flowers every time. If you’re a visual learner, check out the quick video tutorial so you can follow along.
Quick Setup
- Press ASAP after picking.
- Rinse gently. Pat completely dry. Air dry 10-15 minutes.
- Layer: parchment → printer paper → flowers face-down (not touching) → printer paper → parchment.
- Add even, steady weight.
- Store finished blooms in airtight, dark, dry place (best color within 2-4 weeks).
Pick & Prep Fresh Edible Flowers
Harvest or buy fresh edible flowers. If harvesting from your own garden, the best time to do it is in the morning after dew dries. Choose fresh, unblemished blooms. Snip off stems and bulky green bases (calyxes). For thick centers, separate the flower into individual petals. If sourcing your edible flowers, check out my section "Where to Find Edible Flowers for Baking" for my recommended sources.
Wash & Dry the Flowers
Wash the flowers. You need to wash edible flowers before baking to remove dirt, bugs, and any other unsafe residue. A gentle rinse ensures they're safe to eat and beautiful on your desserts.
Go flower by flower, gently rinsing it under the sink and laying on a paper towel to dry. Alternatively, fill a bowl with lukewarm water and let the flowers soak for a few minutes, rotating them a bit.
Dry the flowers. After rinsing, gently shake off as much water from the flower as possible, or use a strainer to let the water run off the flowers. Place the edible flowers on two layers of paper towels, then gently press down to soak up water.
Let your flowers air dry away from a window/sunshine for 10-15 minutes until there's no moisture. If there's moisture, they will brown and curl later.

You'll need a large, heavy book, wax paper, printer paper, and of course, edible flowers! Optionally, tweezers and a food-grade silica gel packet are helpful.

Gently wash the edible flowers then blot to dry on a paper towel. Be sure to let them dry completely. Remove the stems and any thick parts, being careful to keep the flower blossom intact.
Press the Flowers
Build your "pressing sandwich." From the outside in, layer in this order: parchment/wax paper → absorbent paper (printer paper) → edible flowers face-down (not touching) → absorbent paper (printer paper) → parchment/wax paper.
Basically, you're sandwiching your flowers between printer paper then wax paper. The printer paper helps capture any excess moisture from the flowers, and the wax paper helps block any moisture that seeps through the printer paper, ensuring your book doesn't become wet and damaged.
I will sometimes assemble the sandwich directly into the pages of a large, heavy book. If you want to do multiple presses in one book, leave a large section of pages in-between to ensure the flattest results.
Add weight. Place your "sandwich" inside of a heavy book, then stack more weight on top (heavy books, cast-iron skillet, cutting board with weights). Even, steady pressure is the goal.

Fold a piece of wax paper in half and place it in the middle of a large book. Put a piece of printer paper on top of the wax paper. Place the flowers face down on the printer paper, making them as flat as possible.

Put another piece of printer paper on top of the flowers. Be careful to make sure the flowers stay flat and don't fold over.

Close the book, and place another heavy book or two on top. You can also place the printer paper on the counter and place a heavy book on top.

Let the flowers press for at least 1-2 hours, ideally 24-48 hours. Check for dryness and swap out the printer paper if needed. You'll see the moisture on the paper in my photo.
Check for Dryness
Let the flowers press for at least 1-2 hours. If your kitchen if extra humid, you might need to swap out the printer paper with fresh pieces to help wick moisture. For the flattest blooms, it's best to wait 24-48 hours. But if you're impatient like me (and depending on how you want to use them), a few hours can do the trick.
The thinner the bloom (violas, chamomile), the shorter the time. You can also create dried flowers by pressing them for weeks. Just know that the longer you press your flowers, the less vibrant the color will be.
The petals should feel dry at the edges with no cool or damp spots in the center. If they bend or curl, give them another 12-24 hours.
Use or Store the Flowers
Lift the flowers with tweezers to avoid damaging the bloom. If you're not using them immediately for flower cookies or cakes, layer them between parchment in an airtight container. Add a tiny food-grade silica gel packet if you have one. Store them in a cool, dark, dry spot and use within 2-4 weeks for the best color. Avoid the fridge or freezer, since this reintroduces humidity, and condensation causes spots.
Expert Tips for How to Press Flowers
- Press as soon as possible after picking—fresh petals keep the brightest color.
- Be sure to let your flowers dry completely before pressing them.
- Cut or pinch the stem just below the blossom, leaving enough attachment to hold the petals together.
- Lay the flowers face side down, and be careful to make sure the flowers are as flat as possible and the edges aren't folded over. Check out the "Best Edible Flowers to Press for Baking" section for my flower recommendations.
- Press more flowers than you think you'll need, since some will inevitably turn out looking better than others.
- In humid environments, swap out the inner absorbent sheets (printer paper) with new pieces to help wick moisture and keep the colors clean.
- The longer your pressed flowers sit out before being added to your dessert, the more wilted and curled they will become.
- Use tweezers when handling the pressed flowers, as they'll be delicate.
How to Store Pressed Edible Flowers
In an airtight container, layer your blooms between parchment paper, making sure they're flat and not touching to prevent sticking. If you have a food-safe desiccant (silica packet or sachet of uncooked rice), add that inside of the container keeping it separate from the flowers (tape it to the lid).
Store the container in a cool, dark, dry spot away from heat sources, dishwashers, and sunny shelves. For the best color, use them within 2-4 weeks. With 6-8 weeks, expect some fade of colors. Never use flowers that have a musty smell, soft spots, or visible mold.
Avoid these (they ruin color/texture):
- Fridge or freezer: Humidity and condensation leads to wilt and spots.
- Clear jars on counters: Light fades color quickly.
- Textured papers or waxy sheets: Can imprint or stick—parchment and plain printer paper are best.

Troubleshooting Common Problems
Even with careful prep, petals can be fussy. Use this quick diagnostic to rescue most issues.
Problem: Browning/discoloration
Cause: Moisture and heat/light.
Fix: Press ASAP after picking. Use absorbent inner sheets. Swap papers at 12 hours (especially in humid environments). Keep storage cool/dark/dry.
Problem: Mold/musty spots
Cause: Trapped humidity.
Fix: Fully dry before pressing. Change damp papers day one. Ensure steady pressure/airflow. Discard affected pieces.
Problem: Not flat/edges curl
Cause: Not fully dry or centers are too thick.
Fix: Pre-trim bulky calyx/centers. Separate into petals. Add fresh absorbent sheets day one. Extend pressing time 12-24 hours.
Problem: Sticking or imprinted texture
Cause: Wrong paper (glossy/textured) or residual moisture.
Fix: Use plain printer paper inside and parchment or wax paper outside. Avoid textured towels/glossy stock.
Problem: Color fading in storage
Cause: Light/oxygen over time, especially on pale blooms.
Fix: Store in a dark, dry place. Use within a few weeks for best color.
Problem: Petals crack or shatter when lifted
Cause: Over-dry/brittle or rough handling.
Fix: Shorten press time next round. Lift with tweezers. Support with a slip of parchment.
Problem: Petals go wavy after storage
Cause: Reabsorbed humidity.
Fix: Re-press 12 hours with fresh sheets. Add silica packet to storage. Confirm container is truly airtight.
Question: "How long should I press?"
Answer: Depends on thickness, humidity, and desired use.
Guideline: Thin blooms and/or fresh/vibrant look: 24-48 hours, Medium: 2-4 days, Thicker: 4-7 days. Swap inner papers if damp.
FAQs
Mostly, but expect the color to be duller and softer. Color holds best when the flowers are fully dry and the bake isn't too hot or long. Deep hues (violas, calendula, dianthus) usually stay prettier than very pale petals. If ultra-vibrant color is the goal, add flowers after baking onto a thin glaze (like in my pressed flower cookies) rather than baking them directly.
Yes! Tender leaves like mint, lemon balm, and thyme press well. Follow the same steps as I've outlined above.
Some bakers do. It's faster but requires careful timing to avoid scorching. If you're new to pressing, the book/weight method is the most forgiving.
No. Refrigeration and freezing introduce humidity and can cause curling or spots when thawed. Room temperature, dry storage is best.
Only consume verified edible species that are unsprayed. If you're pregnant, immunocompromised, or prone to plant/seasonal allergies, consult your clinician and introduce new flowers in small amounts.
Other Methods for Pressing Flowers
There are many different ways of preserving edible flowers. If you're looking for alternatives on how to dry edible flowers, here are some popular options. Disclaimer: I haven't personally tested these options.
Microwave Press: The fastest method! Sandwich the flowers between absorbent sheets, then between two microwave-safe plates. Microwave in very short bursts (10-20 seconds), let steam vent, and repeat until dry. This works best for thin blooms and when you need them pressed quickly. But watch out! It's easy to scorch or curl the flowers if overheated. Jennifer Howard at Cottage on Bunker Hill outlines the microwave method in-depth.
Low Heat Iron Press: Place flowers between absorbent sheets on an ironing board. With the iron on low heat/no steam, press down (don't slide) for a few seconds, lift, cool, and repeat until dry. This works best for small batches where you want manual control, a quick solution, and it uses tools you already own. However, the timing is fussy and there's a risk of scorching the blooms. Our Upcycled Life has a great YouTube video on how to press flowers using an iron.
Wooden Screw Flower Press: This requires a reusable press with two boards and tightening screws. You stack parchment with absorbent sheets and flowers then tighten evenly. This is best for consistent pressure and bigger batches that's hands-off once set, but it requires a small upfront cost. If you plan to press flowers a lot, it could be worth the investment. Check out Jennifer Howard's beginner guide on how to use a flower press at Cottage on Bunker Hill.

How to Use Edible Flowers for Desserts
Once your blooms are flat, here's how to beautifully add them to your edible flower cakes and other edible flowers desserts.
- Single-bloom statement. Use one petite flower centered on each cupcake, cookie, or tartlet for a minimal, romantic, wedding-friendly look. Sometimes simple is the way to go!
- Crescent or wreath. Arrange the blooms in a crescent on the edge of a round edible flower cake or a full wreath around the rim.
- Botanical collage. Mix petals, tiny leaves, and herb sprigs into a flat "pressed garden" on cookies, cheesecake tops, or bread.
- Petal confetti. Scatter individual petals like sprinkles over glazed cookies or donuts for a playful, modern look.
- Use flowers in cake batter. For a flower confetti surprise, mix finely ground, food-grade petals into simple batters.
- Baking edible flowers. Top your cookies with edible flowers before baking them like Loria Stern's flower pressed cookies.
Recipes with Pressed Edible Flowers
Now that you know how to preserve edible flowers, try them on these stunning recipes.

Pressed Flower Cookies
Soft sugar cookies with a zesty lemon glaze and decorated with vibrant pressed edible flowers, they’re as gorgeous as they are delicious.
More Recipes with Edible Flowers
Looking for other floral dessert recipes? Try these:


Did you make this? I want to know!
⭐️ Leave a star rating & comment below (I read them all!) and tag @belle.fleur.bakery on social media (with a picture or video!).
Not ready to make this recipe yet?
❤️ Click the heart button on the right of your screen to save it for later.
Recipe

How to Press Edible Flowers for Baking (Easy Book-Press Method)
Equipment
- Absorbent paper (printer paper)
- Parchment paper
- Heavy books
- Tweezers
- Food-grade silica gel packet (optional)
Ingredients
- 2 dozen edible flowers (ideal type for pressing)
Instructions
- Choose and prepare the flowers. Harvest flowers in the morning after dew dries or purchase your edible flowers from a safe source. Snip off stems and bulk green bases (calyxes). For larger flowers like roses, carefully remove petals.
- Wash and dry the flowers. Gently wash the edible flowers then blot to dry on a paper towel. Let them air dry for 10-15 minutes until there's no moisture.
- Build your "pressing sandwich." Fold a piece of parchment paper or wax paper in half and place it in the middle of a large book. Put a piece of printer paper on top of it. Place the flowers face down on the printer paper, making them as flat as possible and ensuring they don't touch. Put another piece of printer paper on top of the flowers. Be careful to make sure the flowers stay flat and don't fold over. Close the parchment paper over the top of the printer paper and close the book. Alternatively, you can place the printer paper directly on the counter or another flat surface, rather than inside of the book.
- Add weight. Place another heavy book or two on top. You could also place a cutting board with weights or cast-iron skillet on top. Even, steady pressure is the goal.
- Check for dryness. Let the flowers press for at least 1-2 hours. For the flattest blooms, it's best to wait 24-48 hours. The petals should feel dry at the edges with no cool or damp spots in the center. If your kitchen is extra humid, you might need to swap out the printer paper with fresh pieces to help wick moisture.
- Use or store the flowers. Lift the flowers with tweezers to avoid damaging the bloom. If you're not using them immediately, place them between parchment paper in an airtight container. Add a small silica gel packet if you have one. Store the container in a cool, dark, dry spot away from heat sources. Use within 2-4 weeks for the best color.
Notes
- Press the flowers when they're the freshest for the brightest color.
- Let your flowers dry completely before pressing them.
- Cut or pinch the stem just below the blossom, leaving enough attachment to hold the petals together.
- Lay the flowers face side down, and be careful to make sure the flowers are as flat as possible and the edges aren't folded over. Check out the "Best Edible Flowers to Press for Baking" section for my flower recommendations.
- Press more flowers than you think you'll need.
- Let the flowers press for at least 1-2 hours (24-48 hours is ideal). You can also create dried flowers by pressing them for a few weeks. Just know that the longer you press your flowers, the less vibrant the color will be.
- The longer your pressed flowers sit out before being added to your dessert, the more wilted and curled they will become.
- Use tweezers when handling the pressed flowers, as they'll be delicate.
- Avoid storing pressed flowers in the fridge or freezer—this reintroduces humidity.
Comments
No Comments